After Upgrading Lollipop in Micromax Yureka: Unable to pick calls, this might be a sensor issue


Micromax Yureka smartphone with Cynagonmod OS12 is overall a good phone, but after upgrading it to android, latest version Lollipop which is an available for Yureka you might be getting a sensor issue. You not able to pick calls because nothing is going to be displayed due to the proximity sensor unexpected behavior.

To resolve this issue just GOTO dialing menu and dial below given code and after that you will see a proximity sensor calibration screen where click on start. It will automatically resolve the issue.


*#*#7769#*#*

Feed Up With Unwanted Ads in Browser ...


Are you getting unwanted adds and pop-up in your browser which irritate you and redirect you to some other website. Then, here is the solution.


Adwares and malwares which enters in your system and it spreads all over your system including browsers are comes from the free software's you download form the internet. These are also called as browser hijackers. they are called browser hijackers because they enter in your system and take over your browser, it changes your default search engines and homepage. The main purpose of these adware is to promote websites and their products by means of advertisement in your browser. Sometimes they might be malicious because they can steal your valuable information like accounts, passwords etc.Antivirus might not help to remove these malwares or adwares.


To remove adware follow these steps


Step 1: Downlaod software called Adwcleaner (Download), go and open the downloaded file. Run as administrator.


Step 2: Once program install it will open up as shown below. Now click on scan to start scanning.


Step 3: Once the scan is finished. From the result page, uncheck the folders or files you don't want to remove. It recommended to leave it as it is to remove all adware in your system. Almost all the adware are registry because these adware mostly target registry files. Just click on the clean button to clean your selection.


Step 4: Once cleaning is done, reboot your system to remove all the adwares .


Step 5: After rebooting Pc a report will be generated by Adwcleaner as follows . This report will include summary of all deleted folders and files.


Now, open different browsers in your system to ensure that adware is removed completely.

How to take printout from your Android / iPhone's WhatsApp Messages


With the popularity of  WhatsApp, now businessmen also use this app to talk with their clients these days and if they want to take hardcopy of these messages then here is the way.

 Note: Here, we use Android Phone but this procedure is also applicable for iPhone


Step 1: On Android / iPhone's Open your WhatsApp   and go to settings.


Step 2: Once you open your WhatsApp chat settings then  select email conversation as shown below.
print whatsapp messagesprint whatsapp messages


Step 3: When you select an Email conversation option, it will show your WhatsApp Inbox, select the contact for which you want to take a print out.


Step 4: Next step is  whether you want a conversation without media or with media.
print whatsapp messages

Step 5: Send conversation to your mail ID via configured mail address on your Android phone  either through Gmail or any other Email .
print whatsapp messages

Step 6: Once your message send, open your email on PC and download it.

Step 7: Open the downloaded file with Wordpad  and print it.

How to Set Up and Install Android L SDK On PC

Take a Look of Android L on your PC


Step 1 - Download the Android SDK installer from given link: http://developer.android.com/sdk/index.html. Here, we download windows version.
Note: You have to install Java development kit before SDK installation.

Step 2 - Now, install the downloaded Android SDK setup. Once installation done, run the Android SDK Manager application

http://cdn.teamandroid.com/wp-content/uploads/2012/06/android-4.1-sdk-setup.png

Step 3 - It might take some time to load the application and fetch all the Android SDK packages.
C:\Users\Raj\Desktop\l4.png

Step 4 - Once completed, now select the packages you want to install. Here, we select “Android 5.0.1” and “Android SDK Platform-tools” (under Tools). If you want to use hardware acceleration on Intel x86 Emulator image, then download Intel HAXM x86 from the Extras menu.

C:\Users\Raj\Desktop\l5.png

Step 5- Click on Install package options and it will be prompt to confirm and accept the license of the packages you want to install.

C:\Users\Raj\Desktop\l6.png

Step 6 - Click on the Install button and now wait for the all the packages to download and install.

C:\Users\Raj\Desktop\l7.png


Step 7: Once everything is installed, now let's set up the Android Emulator so that you can go through around Android L on your computer. Go to the TOP option to SDK Manager and run “AVD Manager”. Now click on New and create a virtual device with the details as in the screenshot below. Tick “Use Host GPU” for better loading times.

C:\Users\Raj\Desktop\l new.png 
 Step 8 - Click OK on the result window which appear after pressing the OK button and then select the virtual device you just created from the list and click on Start.

C:\Users\Raj\Desktop\new l.png

Step 9 - In the Launch Options, you can modify the launch screen by selecting scale display to real size option, click on the Launch button to start emulating.

C:\Users\Raj\Desktop\l15.png

Step 10 - The emulator will start and it will take around 5 minutes to boot when loading for the first time. Once your device is on you will get a full experience to try ANDROID L..


C:\Users\Raj\Desktop\l16.png

How to connect Remote desktop Connection From Window 7/8 to Ubuntu 14.04

Remote Desktop Connection of Ubuntu 14.04
Many times we need to operate computer remotely in a network, it is easy when both systems have same OS example Windows to Windows or Linux to Linux .But what happen if you want to access a Ubuntu running machine remotely by windows pc via RDP(remote desktop connection).By default Linux doesn’t support RDP connection but it is possible with some third party tool. For creating a RDP connection  with ubuntu 14.04 follow the given below steps.
Requirements:
  • Xrdp install on ubuntu 14.04
  • Ubuntu 14.04 desktop with administrative privileges
  • Mate an alternative 2D desktop environment install from Mint.
  • Window 7 /8
  • Internet connection
Installation:
Step 1:  First you have to install Mate Desktop environment in your Ubuntu Machine because the popular unity which is the default shell for GNOME 3 environment used by Ubuntu 14.04  is not  accessible form XRDP, it shows black screen in ubuntu 14.04.You can also visit their site http://mate-desktop.org/ , if you wish to install it in other than ubuntu. Run the following command in terminal to add Mate repositrory.
Add Repository
sudo add-apt-repository "deb http://repo.mate-desktop.org/archive/1.8/ubuntu trusty main"

or alternatively using the text editor of your choice add the following to /etc/apt/sources.list:
deb http://repo.mate-desktop.org/archive/1.8/ubuntu trusty main
Install MATE 1.8

sudo apt-get update
# This will install the base packages required for a minimal MATE desktop
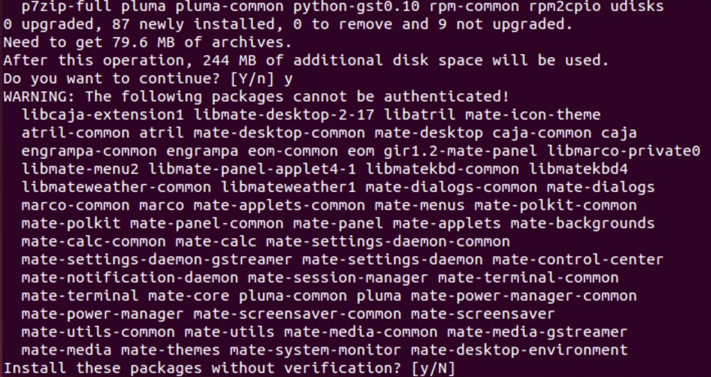
sudo apt-get install mate-desktop-environment mate-notification-daemon
# It will install mate desktop environment


C:\Users\Raj\Desktop\step1.PNG

Step 2: Install third party application XRDP in Ubuntu .For doing this run following command
Install XRDP
sudo apt-get install xrdp

Step 3: Now, we have to configure XRDP so that Windows can get Ubutnu remote desktop connection. For doing this we have to create a .xession file under home directory .Make sure the .xsession file is in your home directory because without it you can’t get the remote session .Each person you want to have remote desktop to your Ubuntu 14.04 desktop will need an .xsession file in their home directory.
Creating .Xession file
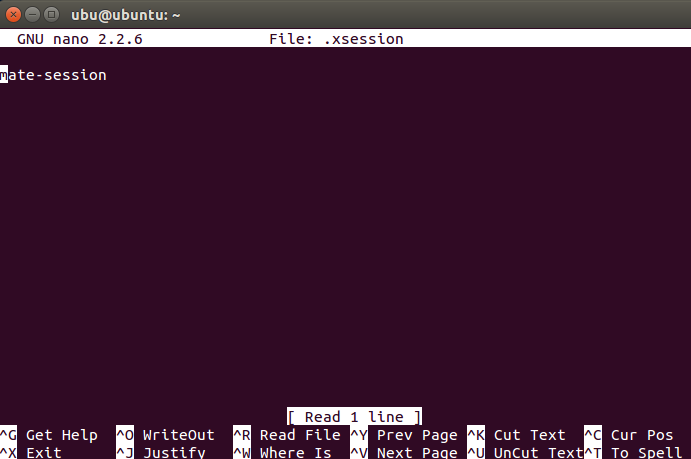
echo mate-session > ~/.xsession
# Command to create .xession file with text mate-session
nano .xession
# To check whether the file created or not
# To get exit from nano press ctrl+x


C:\Users\Raj\Desktop\stepo 2.PNG

Step 3: Restart the XRDP service.
Sudo service xrdp restart
#to restart xrdp service

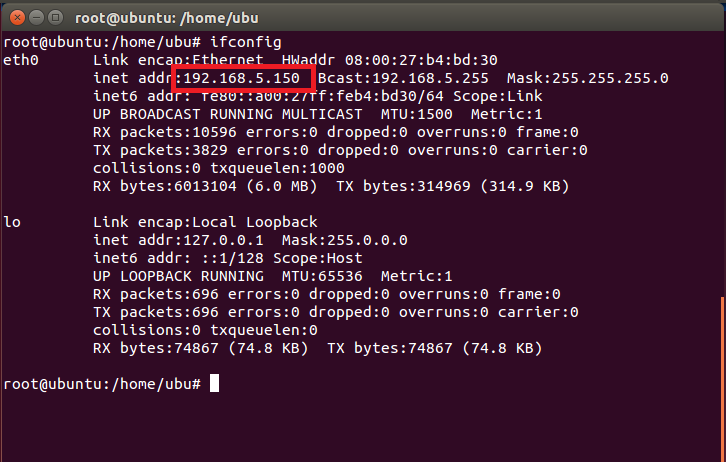
Step4:  To Connect your Windows machine with Ubutnu machine. First you should know the IP address of your Ubuntu machine, type ifconfig to get an  IP address.
Ifconfig
# to see your ip address

C:\Users\Raj\Desktop\step3.PNG
Step 5: Go to your Windows machine and run remote desktop connection tool with the IP address of your Ubuntu machine. Here, our ubuntu machine IP address is 192.168.5.150.
C:\Users\Raj\Desktop\step 4.PNG

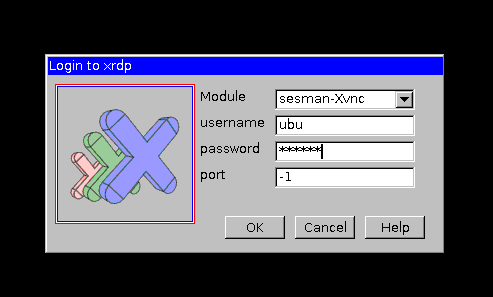
Step 6: Here in RDP window you will ask for your Ubuntu credentials. Just give your username and password associated with your ubuntu account.
C:\Users\Raj\Desktop\satep 6.PNG

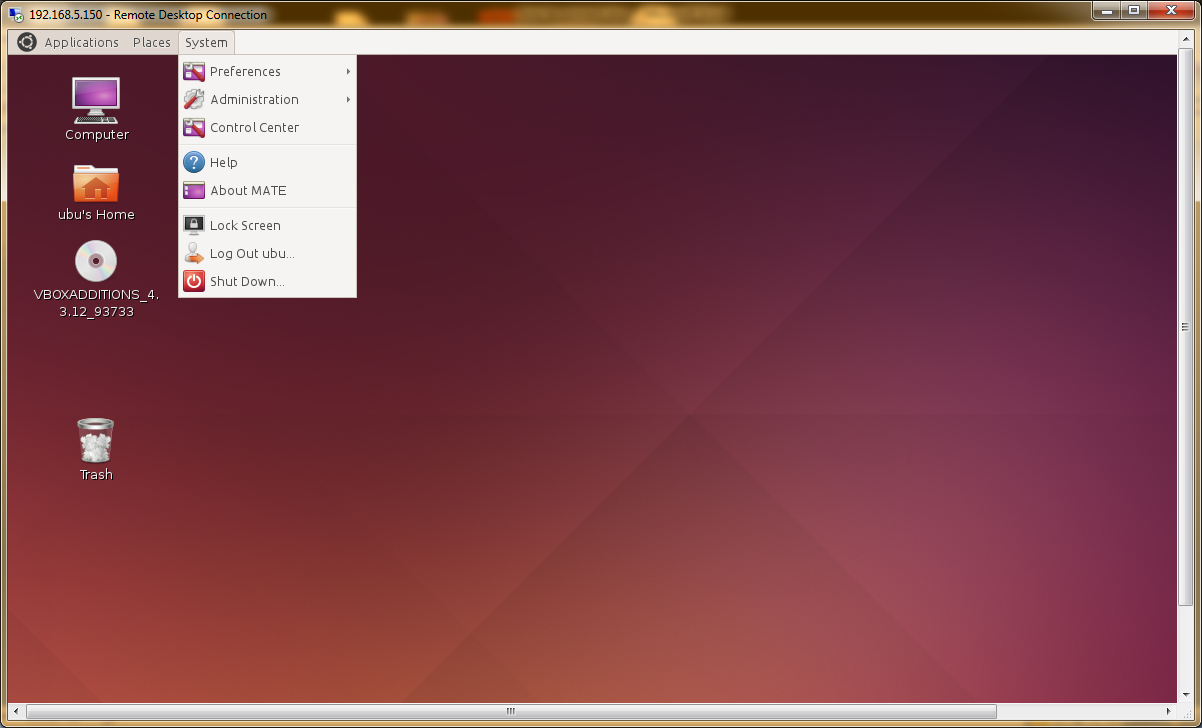
Step 7: You might get black window at start-up of your remote connection but wait for some seconds and a miracle will happen. Now, we hope you got your Ubuntu remote desktop but it will be different in interface wise because you install mate for your remote session. Moreover, the work or task you have do in remote session  is totally independent from your physical Ubuntu machine. Here, screenshots given is one of our Ubuntu machine and another remote session of that Ubuntu machine. Unlike Windows in which at one only one person can perform task on one machine either remotely or physically.  

C:\Users\Raj\Desktop\step9.PNG

Step 8: In your remote session which taken from Windows , if you end that session your all open file like word file or any other will get end and you lose your data if you hadn’t save that .So, to get same session when you come back and connect with your Ubuntu run following command.

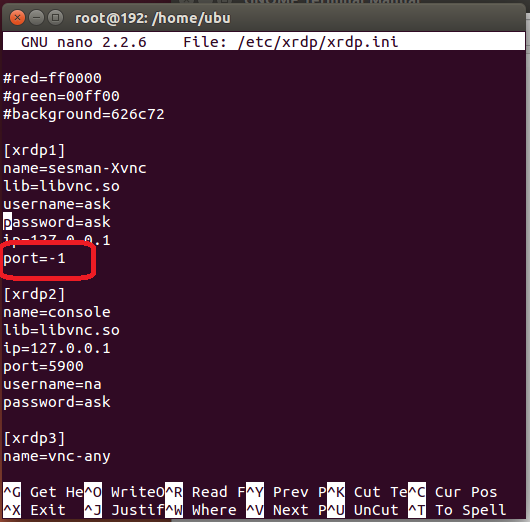
Sudo  nano /etc/xrdp/xrdp.ini
# configure xrdp


C:\Users\Raj\Desktop\step10.PNG

Step 9: Now, a nano editor will open  in which you have to look for xrdp1 and change port=-1 to port=ask-1 and press crtl +x to exit it will ask you for save press y and then press enter. Again go to windows and run RDP to connect with the Ubuntu. This time in credentials box one more option will appear that is port.

C:\Users\Raj\Desktop\step11.PNG

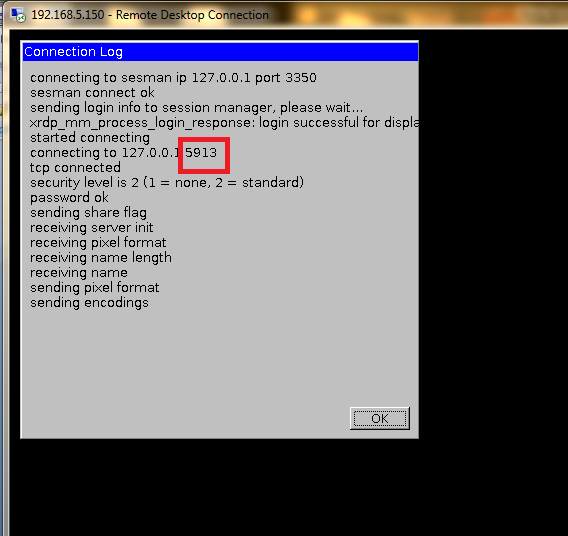
Step 10: Once you fill your username and password, press ok  and a connection log will appear for very short time but you have to note down the tcp port number in our case it is 5913. You can look it in to given screenshot. But it might be different in your case.

C:\Users\Raj\Desktop\step12.PNG

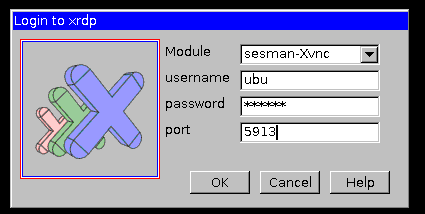
Step 11: If you want to connect the same session every time then use this port number in credential box port column to connect with your Ubuntu machine.In this way you will never lost your work.

C:\Users\Raj\Desktop\step123.PNG

C:\Users\Raj\Desktop\Untitled.png

If you need any help just write down in the comment box or email us. You can also suggest the topics on which you want some tutorials.  

How To Create A Blog Navigation Menu Bar Sticky While scrolling the post in blogger

There are lots of blog templates available on internet which are free but every blog has some different feature and widgets .Many websites and
blogs today using a sticky or fixed navigation menu bar in their sites template which gives extra advantage to their reader that when they scroll to view their posts they can easily choose different pages from navigation menu without going back to the top. For example you can view my blog Navigation menu bar which is sticky. So, if you have blog and you don’t have this feature then here is your solution.


So, it is not some geeky task you just have to follow these steps to Create A Sticky Navigation Menu Bar.

How to create A Sticky Navigation Menu Bar Step By Step


Step 1 :
Go to Blogger Dashboard and Click on Layout


C:\Users\VIJAY\Desktop\Techhod blog1.PNG


Step 2: Click on Add a Gadget


C:\Users\VIJAY\Desktop\Techhod blog2.PNG

Step 3:
Now a pop up window will open, scroll down and click on HTML/JavaScript


C:\Users\VIJAY\Desktop\Techhod blog3.PNG


Step 4: Now paste the given java script code which given below in the content box and click on save.


C:\Users\VIJAY\Desktop\Techhod blog4.PNG


Java script code, copy and  paste it in HTML/java script content box which mentioned in step 4

<script> // Sticky widget // Tutorial // Free to use or share //<![CDATA[ bs_makeSticky("PageList1"); // enter your widget ID here function bs_makeSticky(elem) { var bs_sticky = document.getElementById(elem); var scrollee = document.createElement("div"); bs_sticky.parentNode.insertBefore(scrollee, bs_sticky); var width = bs_sticky.offsetWidth; var iniClass = bs_sticky.className + ' bs_sticky'; window.addEventListener('scroll', bs_sticking, false); function bs_sticking() { var rect = scrollee.getBoundingClientRect(); if (rect.top < 0) { bs_sticky.className = iniClass + ' bs_sticking'; bs_sticky.style.width = width + "px"; } else { bs_sticky.className = iniClass; } } } //]]> </script> <style> .bs_sticking {background:#ffffff !important; position:fixed !important; top:0; z-index:9999; box-shadow:0px 10px 4px -5px rgba(0,0,0,0.3); margin-top: 0; position:relative\9 !important;} </style>


One important thing is you have to change the widget ID in the given script after pasting it in to HTML content box .Here, the ID is "PageList1" (6th line)please change it your navigation bar ID which you will find Template Edit HTML option .To get the sticky navigation bar background according to you original background please change the background color at 28 line of script. Now, just save the arrangements and go to your blog and  I hope you will find your Navigation bar sticky .If you get any trouble you can ask me any time